Memorial Day Activities with Kids
by Katie Beltramo
We're so excited for the summer! The pools are opening, the grill's heating up, and school's winding down. But in the midst of the fun, take a few minutes to teach your family that Memorial Day is a special time to recognize the service men and women who've fought for our country.
Explain the History of Memorial Day
The Memorial Day tradition began around the Civil War, when folks wanted to honor the soldiers who had died in that conflict by decorating their graves. There's some disagreement over whether this started in the south or in Waterloo, NY, but in either case, the tradition started as Decoration Day. Families would gather together at cemeteries, bringing picnics and remembering, together, those whom they had lost. Gradually Decoration Day became Memorial Day, and in 1971, Memorial Day became a national holiday to be celebrated on the last Monday of May. While Memorial Day is specifically a holiday to recognize the sacrifices of men and women who have died in combat, many people also spend the day honoring veterans and current service personnel and working for peace and unity with all people.
Watch a Parade or Memorial Service
We have some local parades, and kids love a parade, but you can also take the opportunity to point out traditions and Memorial Day etiquette. Teach children that we stand and take off hats as veterans pass in a parade. Have them look for American flags, and point out that, officially, flags are to be flown at half-staff until noon on Memorial Day as a remembrance. During services you may also see soldiers fire rifles into the air or people throwing flowers into the ocean in memory of those lost at sea. Next time you're at your local town hall or playground, check for a memorial and take time to read it with your kids.
 Make a Tasty Treat
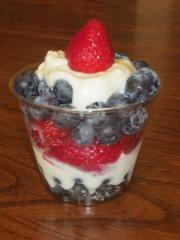
One of our family traditions for Memorial Day and Veterans Day is to bring cookies or another treat to our neighbor, a World War II veteran. It's wonderful to recognize someone your kids know. But it's also fun to enjoy a treat yourselves! A simple one is a blueberry and strawberry parfait with yogurt, whipped cream, or ice cream (ours was made with yogurt). Put them into clear plastic containers to show the patriotic colors, and pop them into the freezer if it's a hot day.
Craft Something Special
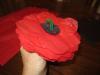
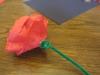
Want to slide in a history lessons while keeping little hands busy? You can help kids make a tissue paper poppy while explaining about Memorial Day's origins, then explain that poppies, because they are blood-red, became a symbol of sacrifice during World War I. These are easy to create, and they make a lovely gift.
Tissue Paper Poppy
You'll need: one sheet of red tissue paper, a small piece of black construction paper, two green pipe cleaners, scissors, and tape.
 1. Cut a small (about 1-inch diameter or less) circle from the black construction paper.
2. Place a piece or two of tape on one side of your circle to reinforce the paper.
3. Fold the circle and make a small cut through the paper and tape near the center, just big enough to push a pipe cleaner through. Then fold and cut one more.
4. Cut all around the edges of your black circle so that they look like fringe.
5. Now, fold your red tissue paper until you have several layers--a 3" x 3" square is about right, but you don't have to be exact.
 6. Cut a vaguely petal-like shape through all the sheets at once. Remember that your flower will most likely not be inspected by a horticulturalist. Cut through all the edges so that each layer becomes separated from the others. Then fold it gently and cut a small hole through the center.
 7. Hold a green pipe cleaner (for little ones, be careful of potentially pointy ends!) and stack the tissue papers onto the pipe cleaner, letting them turn and settle randomly. Then top it with the black construction-paper circle, tape side against the tissue so it isn't showing. Loop the end of the pipe cleaner through one of the center holes, then bend it, hook-like, and loop it back through the second hole, and twist to secure it.
 8. Bunch up the tissue paper, folding it accordian-style for maximum volume in your flower. Flip the flower upside-down and secure it with a piece of tape. I've tried just doing a pipe cleaner and it slips, but you can also cover the tape with a second green pipe cleaner to make the underside of the flower more realistically stem-like.
 9. Holding the bottom of the flower, gently separate the petals until your flower is beautiful.

© 2021, Katie Beltramo, a mother of two, is communications director at Kids Out and About and blogs at Capital District Fun.